
We may earn a commission when you buy through links on this page, at no extra cost to you. It never decides what we recommend. How we make money
Knowing how to use a floor jack safely comes down to one rule repeated in every hydraulic jack manual and federal workplace standard: a floor jack is a lifting tool, never a holding device. A hydraulic seal, check ball, or release valve can lose pressure without warning, which is why OSHA 29 CFR 1910.244(a)(2)(iii) requires every raised load to be cribbed, blocked, or otherwise secured at once before anyone works near or beneath it.
Whether you are rotating tires on a compact sedan or replacing brake pads on a pickup truck, skipping a single setup step can bend a pinch weld, crush a fluid line, or pull a car off its saddle. This guide on how to use a floor jack safely walks through the exact pre-lift preparation, frame and pinch-weld placement, 9-step lifting and jack-stand transfer sequence, release-valve lowering control, and hydraulic maintenance schedule published in manufacturer operator manuals and OSHA’s jack rules.
Quick answer
- Core rule for how to use a floor jack safely:Park on a hard, level surface, set the parking brake, chock the unlifted wheels, lift only at a factory-designated frame or pinch-weld point, and transfer the load onto a matched pair of jack stands immediately after lifting.
- Jack stand capacity trap:As the Harbor Freight 3-Ton Floor Jack Manual (Item 70486) warns, use a matched pair of jack stands per vehicle to support one end only, and read how your stand maker words its rating, because some list capacity per stand and others per pair.
- Controlled lowering:When lowering a vehicle back to the ground, turn the release knob counterclockwise slowly, as the Harbor Freight manual says, so the vehicle descends at a controlled speed.
- Inspection and fluid schedule:Inspect the jack before every use, check it formally at least once every 6 months under OSHA 29 CFR 1910.244(a)(2)(vi), grease the pivot fitting once a month, keep hydraulic oil 1/4 inch below the fill port, and change the hydraulic fluid at least once every three years.
How to use a floor jack safely: pre-lift setup, wheel chocks, and PPE
Most home-garage lifting accidents begin before the jack handle is pumped a single time. As a floor jack raises one corner or one end of a vehicle, the lifting arm swings through an arc. On a hard, flat concrete floor, the steel front rollers and rear swivel casters roll forward a few inches so the saddle stays centered directly underneath the vehicle’s lifting point.
If the floor jack sits on gravel, dirt, soft asphalt, or an uneven driveway seam, the wheels cannot roll with the lifting arc. Instead of rolling under the load, the stationary jack drags the vehicle sideways toward the jack handle until the lifting pad slips off the saddle.
To follow OSHA 29 CFR 1926.305(c) and OSHA 29 CFR 1910.244(a)(2)(i), the base of the jack must rest on a firm foundation or be blocked when a firm foundation is absent, and if there is any possibility of the metal cap slipping, a wood block must be placed between the cap and the load.
Understanding how to use a floor jack safely also means immobilizing the wheels that remain on the ground before you touch the jack. The Harbor Freight 70486 manual lists the same basic pre-lift steps before you roll the saddle under the chassis:
- Park on a flat, level, solid surface safely away from traffic: Never lift a vehicle on a sloped driveway, soft soil, or unblocked asphalt where casters or stand legs can sink.
- Shut off the engine and lock the drivetrain: Turn off the ignition, place an automatic transmission in Park or a manual transmission in its lowest gear, and set the emergency parking brake firmly.
- Chock the tires that stay on the ground: Place wheel chocks tightly against both the front and rear of the wheels on the opposite end of the vehicle from the lift, as the Harbor Freight 70486 manual instructs.
- Break lug nuts loose while all four tires are still on the ground: If your job requires removing a wheel, crack each lug nut loose slightly before lifting so wrench torque does not rock the raised car on its stands.
- Wear protective gear and inspect the jack: Put on ANSI-approved safety goggles and heavy-duty work gloves, verify that the rated load is legibly marked on the jack per OSHA 29 CFR 1910.244(a)(1)(ii), and check for loose hardware, cracked welds, or leaking hydraulic oil before every use.
Where to place a floor jack (and parts to avoid)
To learn how to use a floor jack safely, start with the fact that a hydraulic jack concentrates thousands of pounds of upward force onto a steel saddle only a few inches wide. Placing that saddle on thin floor-pan sheet metal, an aluminum oil pan, a suspension control arm, or an axle tube will crush or bend the component before the tires ever clear the concrete.
The Harbor Freight 70486 manual tells you to position the saddle under the vehicle manufacturer’s recommended lifting point and points to the owner’s manual for the location of the frame lifting point.
Unibody sedans, hatchbacks, and crossovers typically use four reinforced rocker-panel pinch-weld notches (two behind the front wheels and two ahead of the rear wheels) plus a central front subframe crossmember and a rear structural crossmember or tow hook mount. Body-on-frame pickup trucks, full-size SUVs, and trailers use boxed or C-channel steel frame rails. Your owner’s manual shows the exact lift points for your model, so follow it rather than guessing.
| Underbody location | Safe for floor jack saddle? | Why it matters and manual rule |
|---|---|---|
| Reinforced rocker-panel pinch-weld notch (unibody cars and crossovers) | Yes (only inside the factory notch) | Factory-reinforced vertical seam designed to take single-corner lifting loads; use a rubber pad or a wood block per OSHA 1926.305(c) to prevent metal-on-metal slippage. |
| Boxed main frame rail (trucks and SUVs) | Yes | Primary structural member on body-on-frame vehicles; use the frame points your owner’s manual shows. |
| Factory-designated front subframe or rear crossmember jacking pad | Yes (when listed in owner’s manual) | Allows lifting an entire front or rear end at once so you can slide two matched jack stands under the left and right side support points at the same height. |
| Axle tubes, suspension arms, or tie rods | Never | Not built to take a point load from a jack; lift only at the points your owner’s manual lists. |
| Underbody gas lines, brake lines, floor pans, or plastic aero shields | Never | Crushes fluid or fuel lines and caves in unreinforced sheet metal. |
How to use a floor jack safely: 9-step lifting checklist
Once your vehicle is parked on level concrete with the engine off, transmission locked, parking brake set, and opposite tires chocked, follow the 9-step lifting and load-transfer procedure adapted from the Harbor Freight 3-Ton Heavy Duty Floor Jack Manual (Item 70486) and OSHA 29 CFR 1910.244:
- Lower the saddle completely and close the release valve: Turn the floor jack handle counterclockwise to lower the lifting arm all the way down (3.125 inches on the 3-ton low-profile Item 70482, 3.5 inches on the 2-ton low-profile Item 70485, or 5.125 inches on the 3-ton standard Item 70486). Once lowered, turn the handle firmly clockwise to close the hydraulic release valve.
- Roll the saddle under the factory lifting point: Check your vehicle owner’s manual and position the jack saddle directly beneath the recommended frame or pinch-weld lift point, keeping the jack body perpendicular to the frame so the wheels can roll freely.
- Pre-pump to kiss the lifting pad and re-verify alignment: Pump the handle until the top of the saddle nearly touches the vehicle lifting point. Pause and inspect underneath to verify that the lift point sits dead-center in the saddle and clears all brake lines, fuel lines, and rocker trim.
- Raise the vehicle with smooth, full handle strokes: Pump the handle using smooth, full strokes while keeping your head and body completely clear of the load. Watch the stop indicator and never overrun the jack’s maximum lift limit (OSHA 29 CFR 1910.244(a)(2)(ii)); lift only high enough to slide your jack stands into place with a small clearance gap.
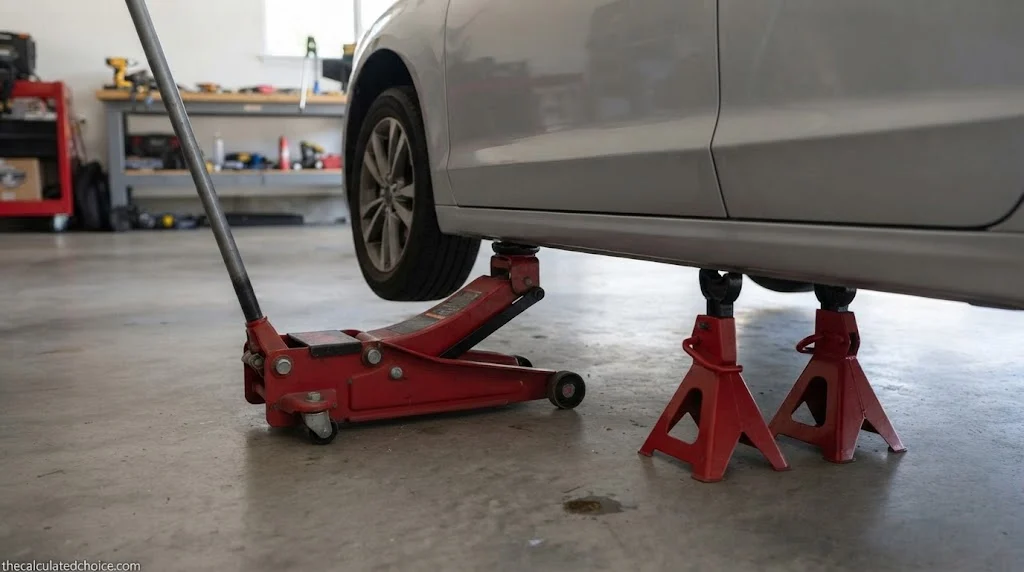
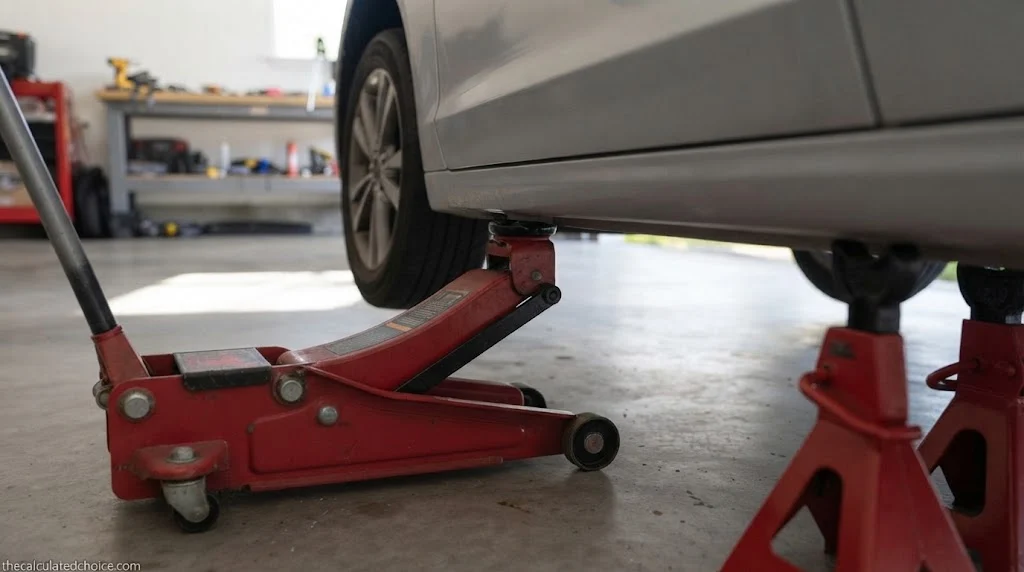
- Slide a matched pair of jack stands under the support points: Without crawling underneath the vehicle, slide two jack stands of appropriate rated capacity under the left and right factory support points on the lifted end. As required by the Item 70486 manual (Step 5), always use two matched jack stands positioned at the same point on each side of the vehicle to support one end only.
- Lock both jack stands at the exact same height: Center the vehicle support points over the jack stand saddles, raise both ratcheting posts or pin-style columns to the identical notch or pin hole, and verify that the ratchet pawl and any secondary locking pin (such as the double-locking pin on the BIG RED T42002A) are fully seated.
- Lower the vehicle slowly onto the jack stand saddles: Slowly turn the floor jack handle counterclockwise to settle the vehicle’s weight onto both jack stand saddles. Confirm that both frame points sit squarely in the middle of the stand saddles rather than riding on a saddle lip.
- Fully lower the floor jack once the stands carry the load: Following Harbor Freight Manual 70486 Step 8, once the vehicle is fully seated on the jack stands, continue slowly lowering the jack until it is completely lowered.
- Remove the jack and perform a stability push check: Roll the lowered jack out of the work path (Manual 70486 Step 9) so nobody trips over the handle, and give the vehicle a firm closed-hand push at the bumper or tire from the outside to make sure the chassis does not rock before you begin work.
Jack stand pair rating and height-matching math
For how to use a floor jack safely with stands, a floor jack’s maximum lift height means nothing if it cannot raise the chassis high enough to clear the minimum saddle height of your jack stands, and stand makers do not all word their ratings the same way.
The Harbor Freight 3-Ton Floor Jack Manual (Item 70486) says to use a matched pair of jack stands per vehicle to support one end only. ESCO lists its 10498-PAIR at 3 tons for each stand and BIG RED lists its T42002A as 2 tons each, whereas Torin’s owner’s manual for its T-series stands says rated capacity is per pair only. Read how your stand maker states its rating before you do the math.
You also have to check that your floor jack’s maximum saddle height exceeds the jack stand’s minimum height plus tire droop. If you are still matching a jack’s tonnage and stroke to your vehicle, read our companion guide on What Size Floor Jack Do I Need? for the full weight and clearance breakdown.
Floor jack to jack stand height-transfer check
Step 1: Verify that the stand capacity, as the maker states it, is at least the weight carried by the lifted end of the vehicle.Step 2: Required Floor Jack Max Lift is at least Jack Stand Min Height + Suspension Droop Margin (example: 2 to 4 in. of wheel travel before the frame clears the stand).Example A (Low-profile 2-ton jack + 3-ton stands): Harbor Freight 70485 max height is 16-7/8 in. (16.875 in.). ESCO 10498-PAIR min height is 13.2 in., leaving 3.675 in. of height margin above the lowest pin hole.Example B (Standard 3-ton jack + 6-ton stands): Harbor Freight 70486 max height is 18-1/4 in. (18.25 in.). The Arcan ALJS6 6-ton stand min height is 15.5 in., leaving only 2.75 in. above the lowest notch, whereas an extended-reach jack like the Arcan A20016 lifts to 24 in., giving 8.5 in. of margin.Always check both minimum stand height and maximum jack reach before lifting so you never have to overrun the jack’s stop indicator. Sources: Harbor Freight Manual 70486, ESCO 10498-PAIR Specs, Arcan ALJS6 Specs, and Arcan A20016 Specs.
How to use a floor jack safely when lowering and maintaining your jack
Dropping a vehicle back onto its tires too quickly is one of the easiest ways to pinch a foot, shock-load the hydraulic cylinder, or catch a forgotten creeper underneath the oil pan. Knowing how to use a floor jack safely through the end of the job requires following the lowering sequence and routine inspection schedule laid out in Harbor Freight Manual 70486 and OSHA 29 CFR 1910.244(a)(2):
- Clear every tool, drain pan, and bystander from beneath the vehicle: Check all four corners to make sure no tools, parts, or hands remain under the chassis or near the tires.
- Raise the load just enough to unseat the jack stands: Position the floor jack saddle directly under the factory lifting point, turn the handle firmly clockwise to close the release valve, and pump the handle until the chassis rises just high enough to clear the jack stand saddles. Slide both jack stands out from under the vehicle completely.
- Open the release valve slowly: Stand clear of the vehicle and slowly turn the release knob counterclockwise, as Manual 70486 directs in its Lowering section, so the vehicle comes down onto the ground gently.
- Retract the ram completely and torque your lug nuts: Once the vehicle’s weight is fully on its tires, lower the jack saddle all the way down so the hydraulic piston is not left exposed to dust or moisture, roll the jack to a dry storage spot out of the reach of children, and tighten your wheel lug nuts to factory specification (see our guides on the lug nut torque chart by vehicle type and the best torque wrench for lug nuts).
Knowing how to use a floor jack safely also means maintaining it, because between jobs hydraulic floor jacks need basic preventive maintenance so air pockets or low oil never stall a lift mid-stroke. Under OSHA 29 CFR 1910.244(a)(2)(vi), any jack in constant or intermittent use at one location must receive a thorough inspection at least once every 6 months, and any jack subjected to an abnormal load or shock must be inspected immediately before and immediately thereafter.
Under OSHA 29 CFR 1910.244(a)(2)(viii), a jack that is out of order must be tagged accordingly and never used until repairs are completed.
For home-garage maintenance, Harbor Freight Manual 70486 says to inspect the jack before each use, lubricate the grease fitting once a month with a grease gun, use high-grade hydraulic fluid filled to 1/4 inch below the top of the fill port, and change the hydraulic fluid at least once every three years.
How to use a floor jack safely: failure modes and manual fixes
When a floor jack feels spongy, refuses to lift to its full height, or will not lower all the way down, the cause is almost always trapped air in the hydraulic circuit, an improperly closed release valve, or low hydraulic oil. Learning how to use a floor jack safely means recognizing these warning signs before a load is in the air and never adjusting the safety valve (Manual 70486, page 3: “Do not adjust safety valve.”).
The table below summarizes the official troubleshooting steps and air-bleeding procedure from the Harbor Freight Floor Jack Owner’s Manual (Item 70486):
| Symptom | Likely cause (per the manual) | What the maker says to do (with no load on the jack) |
|---|---|---|
| Will not lift at capacity, spongy stroke, or saddle will not lift all the way | Release valve not fully closed, air in the system, or low hydraulic fluid | Check that the release valve is fully closed, bleed the system, and check the fluid level, refilling with high-grade hydraulic fluid if needed (Manual 70486, pages 5 and 8) |
| Saddle lowers under load, or handle moves up under load | Release valve not fully closed, or blocked valves | Close the valve fully; if the valves may be blocked, lower the saddle, lift it by hand, open the release valve and force the saddle down as quickly as possible to flush them (Manual 70486, page 8) |
| Fluid leaking from the fill plug | Too much hydraulic fluid | Check the fluid level and adjust it (Manual 70486, page 8) |
| Jack is out of order | Damage or failure found at inspection | OSHA 1910.244(a)(2)(viii): tag the jack and do not use it until repairs are made |
What to buy for a safe home garage lift
A safe lifting setup requires pairing your floor jack with properly rated support equipment rather than relying on the jack alone. Before lifting a vehicle at home, make sure your garage kit includes these essentials:
- A floor jack with overload and bypass valve protection: The Arcan 3-ton low-profile jack (3 inches to 19.72 inches lift range, 76.8 pounds) and the Arcan A20012 (3.75 inches to 21.75 inches) both list bypass and overload safety valves on their pages, and OSHA 1926.305(a)(2) requires a positive stop on every jack to prevent overtravel. See our guide to the best floor jack for a home garage when selecting a model.
- A matched pair of locking jack stands: Compare heights and ratings on the maker pages: the 2-ton BIG RED T42002A (10.8 to 16.5 inches, 2 tons each stand), the 3-ton Arcan ALJS3 (11-5/8 to 17-1/2 inches), and the ESCO 10498-PAIR (13.2 to 21.5 inches, 3 tons each stand). See our companion review of the best jack stands for full details.
- Solid wheel chocks and a rubber saddle pad: Chocking both front and rear sides of the unlifted tires prevents rolling on level concrete, while a rubber saddle pad prevents metal-on-metal contact against factory pinch welds.
How we researched this guide
We did not run destructive shop tests; to explain how to use a floor jack safely with zero guesswork, we reviewed federal workplace jack regulations, federal vehicle lifting bulletins, and manufacturer operator manuals line by line.
Sources: OSHA 29 CFR 1910.244, OSHA 29 CFR 1926.305, Harbor Freight Manual 70486
Bottom line: Learning how to use a floor jack safely comes down to parking on level concrete, locking the parking brake, chocking the opposite tires, lifting only at factory frame or pinch-weld points, and transferring the vehicle onto a matched pair of jack stands before any part of your body goes underneath.
If you follow every step of how to use a floor jack safely, including opening the release knob slowly when lowering and inspecting your jack at least once every 6 months, every home tire rotation or brake job stays predictable and secure.
Lifting is only half of garage safety. If you also carry recovery gear, read our tow strap vs recovery strap guide before your next pull.
Working under a car also means good light: see our guide to the best rechargeable work light for the garage.
Frequently asked questions
Can I change a tire or work under a car using only a floor jack without jack stands?
Should the floor jack stay under the car as a backup after the car is on jack stands?
Are 3-ton jack stands rated for 3 tons each or 3 tons for the pair?
Can I use a floor jack on an asphalt driveway or gravel surface?
How should I lower a car safely with a floor jack?
How often does a hydraulic floor jack need inspection and fluid changes?

Researched by Shahzad
Amazon seller who researches products using sales-rank history, price tracking and owner reviews before recommending anything. Read our disclosure.