
We may earn a commission when you buy through links on this page, at no extra cost to you. It never decides what we recommend. How we make money
Consistent car battery care is the difference between an engine that cranks on the first turn of the key and a dead vehicle stuck in a parking lot. Although every standard automotive starting battery is labeled as a 12-volt unit, OPTIMA Batteries explains that each of the six internal cells must measure at least about 2.1 volts at full charge, giving a healthy resting reading of at least 12.6 volts. Whenever any lead-acid battery–flooded or AGM–drops below 12.4 volts and sits in that discharged state, lead sulfate crystals begin forming on the plates, permanently shrinking capacity and service life.
Skipping routine voltage and terminal checks costs far more than a replacement battery. According to OPTIMA’s diagnostic guide and Interstate Batteries’ support FAQs, a deeply discharged battery may not be fully recharged by the alternator, and relying on driving to recharge it puts a lot of stress on the vehicle’s charging system. Worse, Battery Tender’s safety guide notes that reversed jumper-cable polarity or voltage spikes can damage sensitive engine, body, and transmission control modules.
Quick answer
- Resting voltage targetMake a multimeter check part of your car battery care routine after the car sits for 12 to 24 hours: a fully charged 12V flooded battery reads 12.6V or higher (AGM reads 12.8V to 13.0V), and sulfation starts below 12.4V (OPTIMA; Battery Tender).
- Cranking & alternator checksDuring a 5-to-10-second starter crank at about 70°F, voltage must stay above 9.6V; with the engine held near 2,000 rpm, alternator output should read 13.7V to 14.7V (Battery Tender Multimeter Guide).
- Key-off parasitic draw limitAfter closing all doors and waiting 20 to 45 minutes for vehicle modules to sleep, normal parasitic draw is 25 mA to 50 mA; anything above 50 mA (0.05A) deserves investigation (Battery Tender).
- Safe cable & cleaning ruleClean corrosion every 6 months with 1 part baking soda to 5 parts water; always disconnect the black negative (-) cable first and reconnect it last (Interstate Batteries).
- Jump-starting cable orderClip red (+) to the dead battery, red (+) to the good battery, black (-) to the good battery, and the final black (-) clamp to unpainted engine block metal at least 12 inches away from the dead battery (Battery Tender).
12V state-of-charge voltage chart and the 12.4V sulfation rule
Measuring resting voltage across the battery terminals is the fastest way to judge state of charge, provided you clear surface charge first. Surface charge is a temporary voltage bump left on the plates from recent driving or charging. Battery Tender recommends letting the vehicle sit untouched for 12 to 24 hours before measuring; if you cannot wait overnight, switch the headlights on for 2 minutes with the engine off, turn them off, and wait 5 to 10 minutes (Battery Tender).
Compare your digital multimeter reading against the state-of-charge figures from Battery Tender and OPTIMA Batteries below. On serviceable flooded batteries, Battery Tender also notes that a hydrometer reading of 1.265 specific gravity indicates a full charge.
| Approx. State of Charge | 12V Flooded Resting Voltage (Battery Tender) | AGM & Lithium Notes | Freezing Point (Battery Tender / Interstate) | Required Action |
|---|---|---|---|---|
| 100% (Full Charge) | 12.6V to 12.8V (6 cells x 2.1V) | AGM rests at 12.8V to 13.0V (LiFePO4 13.2V to 13.4V) | About -75°F (Interstate Batteries) | Healthy; proceed to cranking load check |
| 75% Charged | 12.4V | Minimum safe voltage before sulfation begins below 12.4V | Not published | Acceptable; top off with a smart charger before storage |
| 50% Charged | 12.2V | Half discharged; sulfation accelerates if left sitting | Not published (a 40% charged battery can freeze near 0°F to -16°F) | Recharge completely with an AC charger before load checking |
| 25% Charged | 12.0V | Deeply discharged | Not published | Active sulfation risk; recharge immediately |
| Discharged (Dead) | 11.9V or lower | Below 10.5V is deeply discharged (Battery Tender) | Around 15°F (-9°C) to 20°F | Full multi-stage recharge, rest 12 to 24 hours, and re-check |
How to check resting voltage, cranking load, alternator output, and parasitic draw
A battery can show 12.6V at rest and still fail to turn the starter motor if internal plate resistance has climbed. Conversely, a fresh battery will go flat in days if the alternator undercharges or a stuck relay pulls current overnight. Run the complete home multimeter sequence from Battery Tender’s 5-Step Multimeter Guide:
- Step 1 — Resting voltage check (20V DC setting): Confirm the battery reads at least 12.4V at rest (12.6V or higher for 100% charge on a flooded unit). If resting voltage is below 12.4V, recharge the battery fully with a smart charger and let it rest 12 to 24 hours before running a load check; if it still cannot hold 12.4V after a full charge and overnight rest, the battery needs replacement (Battery Tender).
- Step 2 — Cranking load check (5 to 10 seconds): With the multimeter probes touching the positive (+) and negative (-) lead terminals, have a helper crank the engine for 5 to 10 seconds and watch the lowest voltage displayed (Battery Tender). At about 70°F, a healthy battery stays above 9.6V. A drop between 9.0V and 9.6V signals a weak battery, and any drop below 9.0V on a fully charged battery means replacement is needed.
- Step 3 — Alternator running voltage check (near 2,000 rpm): Start the engine, hold speed near 2,000 rpm with the headlights and cabin blower turned on, and measure voltage across the battery terminals (Battery Tender; OPTIMA). A healthy charging system outputs 13.7V to 14.7V. A reading below 13.5V indicates a weak alternator or loose drive belt that is undercharging the battery, whereas a reading above 15.0V warns of a failing voltage regulator that will overheat and ruin the battery.
- Step 4 — Parasitic draw check (10A DC current setting): Turn off the ignition and all accessories, close every door, and wait 20 to 45 minutes so onboard computer modules go to sleep (Battery Tender). Disconnect the negative (-) battery cable, set your multimeter to 10A DC, and connect the meter probes in series between the negative battery post and the disconnected negative cable clamp. Normal sleep draw is 25 mA to 50 mA (0.025A to 0.050A). If the reading exceeds 50 mA, pull fuses one at a time until the current drops to pinpoint the faulty circuit–and never crank the starter with the meter wired in series, or starter current will blow the internal meter fuse.
How to clean corroded battery terminals and disconnect cables safely
Keeping posts and clamps clean is a vital part of car battery care because corrosion can add resistance that makes lights dim or flicker and can keep the car from starting. According to Interstate Batteries, vented hydrogen gas reacting with under-hood metals produces different colors of buildup: green or blue corrosion comes from corroded copper wiring or clamps, white corrosion comes from corroded lead, zinc, or aluminum posts, and brown or red buildup comes from iron or steel hardware. Furthermore, OPTIMA Batteries points out that heavy corrosion isolated to the positive (+) post can indicate overcharging, while heavy corrosion isolated to the negative (-) post suggests undercharging or a poor chassis ground.
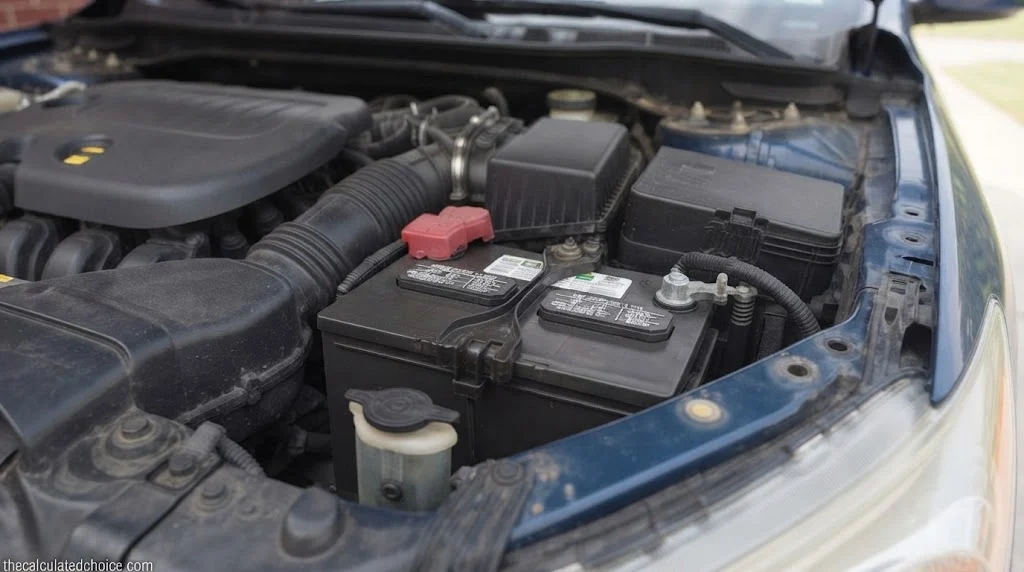
Interstate Batteries recommends inspecting and cleaning terminal corrosion every six months using this step-by-step sequence (Interstate FAQs; Interstate Disconnect Guide):
- Plug in a memory saver and shut off the ignition: Disconnecting a car battery without backup power will erase vital data from the car’s computers (Interstate Batteries). Use a memory saver that plugs into the OBD II port or the cigarette lighter before loosening any clamps.
- Disconnect the black negative (-) cable first: Using a 10-millimeter open-end wrench, loosen the bolt on the black negative (-) clamp and lift it away from the battery post first (Interstate Batteries). Next, loosen the red positive (+) clamp and wrap it in a cloth so it cannot spring back against bare metal. If lifting the battery out of the tray, keep it upright so electrolyte cannot spill–and brace yourself, as automotive batteries weigh 40 pounds or more.
- Scrub with a 1-to-5 baking soda and water solution: Mix 1 part baking soda with 5 parts water (Interstate FAQs). Avoid getting the mixture into the raised vent caps or holes, scrub the posts and clamps with an old toothbrush and a wire battery post brush until the lead is bright, wipe the residue away with a paper towel, and dry the top thoroughly.
- Reconnect the red positive (+) cable first and black negative (-) last: Attach and tighten the red positive (+) clamp first, then attach and tighten the black negative (-) ground clamp second so the clamps cannot rotate by hand (Interstate FAQs; Battery Tender). Finally, apply dielectric grease or anti-corrosion spray over the outside of the reconnected terminal assembly to seal out moisture–never smear grease between the bare post and the inside of the clamp before tightening (Interstate Batteries).
Charging math and temperature rules for car battery care
Effective car battery care during storage requires matching your charger’s amperage to your battery’s amp-hour (Ah) capacity. When a car sits parked, Battery Tender notes that natural self-discharge drains 3 percent to 5 percent of charge per month at 70°F, while a normal 25 mA clock and computer draw pulls about 18 Ah per month (0.025A x 720 hours).
How to calculate battery recharge hours by charger amperage
Formula: (Battery Capacity in Ah x Depth of Discharge) / Charger Amps = Base Hours (add 10% to 25% for charging losses and Stage 3 Absorption taper)40 Ah Compact Car at 50% discharge (20 Ah needed): 10.0 hrs at 2A | 2.5 hrs at 8A | 1.3 hrs at 15A45 Ah Sedan at 12.2V / 50% discharge (22.5 Ah needed): (45 x 0.5) / 3A = 7.5 base hours (or 9.0 hours from 25% discharge on a 1.25A maintainer)60 Ah Midsize Sedan at 50% discharge (30 Ah needed): 15.0 hrs at 2A | 3.75 hrs at 8A | 2.0 hrs at 15A70 Ah to 80 Ah SUV/Truck at 50% discharge: 4.4 hrs at 8A (70 Ah) | 20.0 hrs at 2A, 5.0 hrs at 8A, or 2.7 hrs at 15A (80 Ah)Charger sizing rule: Choose a smart charger delivering roughly 10% to 20% of the battery’s amp-hour rating to recover a depleted battery, and use a low-amp four-stage maintainer (Initialization, Bulk Charge to about 80%, Absorption, and Float) for long-term storage. Battery Tender 12V Guide; Battery Tender Recovery Guide
Safe jump-starting sequence for car battery care
If your battery is partially or deeply discharged (12.5V down to 10.5V) and you need to jump-start the vehicle, inspect the case first: never jump-start a battery that is case-damaged, reading 0V, or frozen (Battery Tender Jump-Start Guide). Because a discharged battery at 11.9V can freeze at around 15°F to 20°F (Interstate; Battery Tender), move a frozen battery to a 40°F+ room to thaw for at least 24 hours instead of jumping it.
When using 4-gauge or 2-gauge copper jumper cables (at least 20 feet long), park the two vehicles so they do not touch, set both parking brakes, turn off all accessories, and connect the four clamps in the exact industry-standard order from Battery Tender and Interstate Batteries:
- Clamp 1 (Red +): Clip to the positive (+) terminal of the dead battery.
- Clamp 2 (Red +): Clip to the positive (+) terminal of the good donor battery.
- Clamp 3 (Black -): Clip to the negative (-) terminal of the good donor battery.
- Clamp 4 (Black – to bare metal ground): Clip to an unpainted metal bolt head, alternator bracket, or frame rail on the dead vehicle’s engine block at least 12 inches away from the dead battery–never to the dead battery’s negative post, where the final connection spark could ignite vented hydrogen gas.
- Start and remove in reverse order: Start the donor vehicle, hold engine speed at 1,500 to 2,000 rpm for 5 minutes (10 minutes in extreme cold), then crank the dead vehicle for a maximum of 10 seconds (waiting 30 seconds between up to 3 attempts). Once running, remove the clamps in the exact reverse order: dead vehicle engine-block ground first, good battery negative second, good battery positive third, and dead battery positive last.
Five car battery mistakes that ruin plates and electronics
- Idling a stored car for 5 minutes or making 10-minute trips to “recharge” the battery: Battery Tender notes that a 15-minute trip rarely replaces the energy used to start the engine. Drive for 15 to 20 minutes or longer, or use the correct charger if the battery is deeply discharged (Interstate Batteries).
- Pouring Coca-Cola on corroded battery terminals: Despite old roadside myths, Interstate Batteries warns never to clean a battery with soda: it leaves a sticky, gummy residue across engine bay parts. Use a 1-to-5 baking soda and water mix instead.
- Smearing dielectric grease between the lead post and the inside of the cable clamp: Interstate Batteries says not to put dielectric grease between the post and the clamp.
- Leaving an unregulated constant-current trickle charger connected for weeks: Unlike a four-stage smart maintainer that monitors the battery, a trickle charger keeps pushing current, which overheats the electrolyte, wastes water, and corrodes the grids (Battery Tender).
- Confusing cable order between battery removal and jump-starting: As Interstate Batteries highlights, the two procedures are opposites: disconnecting a battery always starts with the black negative (-) cable first, whereas connecting jumper cables or a charger always starts with the red positive (+) clamp first.
Parking a car for the cold months? Read how to store a car battery over winter, and see the best battery maintainer for classic cars if yours is a collector vehicle.
How we researched this guide
We did not run lab checks on batteries for this car battery care guide; instead, we verified every voltage threshold, milliamp draw limit, charging formula, and safety sequence against official battery manufacturer guides and support FAQs.
Sources: OPTIMA Battery Voltage Guide, OPTIMA Diagnostic Guide, Battery Tender Multimeter Guide, Interstate Batteries FAQs
Bottom line
Reliable car battery care comes down to three habits: keeping resting voltage at 12.6V or higher (and never letting a battery sit below the 12.4V sulfation threshold), scrubbing terminal corrosion every six months with a 1-to-5 baking soda and water mix after disconnecting the negative cable first, and using a four-stage smart maintainer whenever your vehicle sits parked. Build these checks into your seasonal car battery care routine, and you give the battery the best chance of reaching the three-to-five-year life Interstate Batteries describes. Related guides: how to jump start a car with another car, how many cold cranking amps you need, how to test a car battery with a multimeter, and how to clean car battery terminals. For the rest of the car, use our monthly car maintenance schedule.
Frequently asked questions
What voltage should a healthy 12V car battery read at rest?
Which battery cable should you disconnect first and reconnect last?
Will driving for 15 minutes fully recharge a dead car battery?
What is a normal key-off parasitic battery draw on a modern car?
At what temperature can a discharged car battery freeze?
What does battery corrosion color or single-post buildup tell you?

Researched by Shahzad
Amazon seller who researches products using sales-rank history, price tracking and owner reviews before recommending anything. Read our disclosure.